Modern Parts vs Proprietary Shifter Bosses
At the time, I didn’t realize the Kodiak that I recently acquired was going to be as challenging as it has been. But then again, nothing good every came easy.
Looking past the ragged parts, surface rust and a frame that’s been rode hard and put away wet, I anticipated a quick strip down and speedy build up.
Ahhh, optimism!
With the tear down complete, the frame scrubbed, the rust removed (best as I can) along with the parts cleaned, oiled and lubed, one would think I was on my way.
Enter the details of rebuilding.
This frame was constructed within a window when Shimano was pulling some odd moves. With advent of the Dura-Ace and the AX and EX group sets Shimano decided to create their own proprietary style of shifter boss. It is unclear how long this style of shifter boss was around but it is clear that its reign was short lived and didn’t exactly take off.
The “Shimano Shifters” or “B-Shifters” look like normal bosses but the anchor holes for the ends of the springs are on the outboard sides. This also gives them a rounded base rather than the conventional square style boss. When you look at them straight on, they resemble a keyhole.
The stock Deore shift levers fit this obscure style boss and I hear that some vintage Shimano index shifters can able however mounting other brands of shift levers and/or down tube cable stops can be problematic.
Since I have decided to install period appropriate Suntour bar end shifters and need down tube cable stops, I am now categorized within the problematic category.
Another element I did not consider was having difficulty finding screws which would hold the cable stops to the bosses. 4mm was too small and 5mm was too big so I ended up using standard size stainless steel bolts instead of metric. Of course, these also had to be extra long to make it into the bosses.
Let’s see a picture based timeline of the fallout:
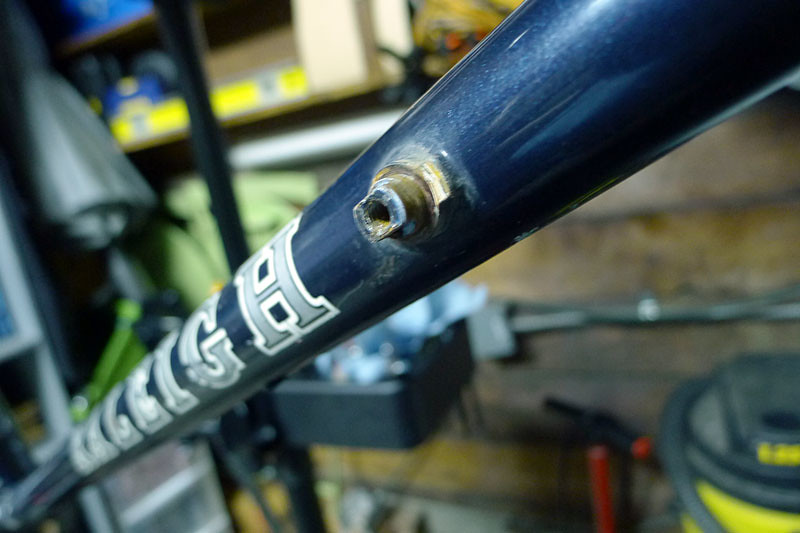
Side view of the “B” style Shimano proprietary shifter boss. This shot was taken prior to cleaning and removal of surface rust.

Straight ahead view of shifter boss. Note the circular keyhole pattern.

Marking and securing the cable stop.

Tools: A vise, file, patience and a steel brush to clear the aluminum burs off the file.

One notched, one to go!

Another angle to show underside of cable stop. New, longer screws will be required.

Altered cable stops side view.

Altered cable stops top view. Note the slight gap.

Cable stops all wired up.

Another angle.
Lucky for me this less than ideal solution is only temporary.
The focus of this build is to determine potential, fit and to give me something to ride all summer. If the frame is everything I hope it will be, when the late fall hits, all the tweaking and adjusting will be in vain. All parts will be stripped off (again) and the frame will be shuttled away to a local frame builder. The mysterious bosses will be swapped out for something standard but I realize that once I have traveled down that path of destruction the only logical next step is removing the paint from the frame and doing a full repaint. But, that reality is still tentative and half a year away.
So for now, this setup is going to have to be good enough.
** Update 12/20/13 **
As mentioned in other posts, Dan, a cyclist from Baltimore, Maryland and regular comment contributor on the website, has passed along more than just perils of bicycle history wisdom. As an owner of multiple Raleigh Kodiak bicycles, Dan has also gone through the conundrum of modifying shifter bosses to accept cable stops rather than keeping the stock Shimano Deore down tube shift levers. Attached are a few images and a short write up Dan shared that I felt would enhance this post for those who will inevitably run into the same shifter boss incident as Dan and myself. Hopefully, this helps you out, future reader.
Using Shimano cable stops and drilling the inside of the stops using a drill press and a 1/2″ drill, the stops fit snugly against the down tube. (Hint: I screwed the stops, inside facing up, onto a scrap 2×4 with a screw that fit in the mounting hole. I then mounted the 2×4 into my press vise, and held the stops from turning using a pair of vise grips. I drilled very slowly, making sure not to go too far.) I also had to manually file one edge of each stop to fit over the tab of the boss.
I removed the front side stop from the boss, spun it on the cable, and placed an unaltered one next to it. Hopefully its easy to see the difference between the “new” and “drilled” stops.

Comparing unaltered and modified shifter bosses
The original 4.5mm screws that held the original shifters on the down tube bosses have 2 full turns of grip on the new cable stops, enough to be snug.The images of the stops installed show they mount flush to the tube and the original down tube screws reach the boss with just over 2 turns until snug (without washers).


A job well done, Dan. Your cable stops fit on your shifter bosses quite snug without any unsightly gaps.
Thanks for sharing your process and the final results!
** Update 6/2/14 **
Dan took one approach by modifying the cable stops only. This is obviously a perfectly adequate way to achieve desired results however, since my above solution was dubbed “temporary”, I decided that after a year in service, my original result needed refreshing. Since a drill press is not something I have in my arsenal, I went with the somewhat more intimidating and permanent choice of modifying the shifter bosses.
My goal was to take the 4.5mm bosses and by using a tap, cut new threads to accommodate a more common, easily found 5mm socket head cap screw.

Tap and handle: Tools of the thread cutting trade
The process ended up being simple, quick and extremely effective.
Step 1: Firmly assemble the tap and handle.
Step 2: Clean out shifter boss mounting holes leaving them free any of grease and grime.
Step 3: Add a few dribbles of oil (I used motor oil in a syringe) on the inside threads of the bosses and on the tip of the tap.
Step 4: Insert the tap into the mounting hole. Slowly and gently, twist the tap handle clockwise a quarter of a turn at a time. After a half turn or so, back the tap out by turning it counterclockwise to cut off the newly produced threads. Continue until the tap bumps up against the frame inside the shifter bosses.
Step 5: Twist the tap fully back out, clean out the hole and turn clockwise to reinsert the tap one last time to make sure threads were cut well and no metal chards were left behind.
That’s it!
You’re done.

Finished product with 5mm tapped threads
This solution turned out to be a decidedly more secure cable stop to shifter boss connection. I was able to snug them down removing what Dan accurately described above as “unsightly gaps.”
My method takes an extra step of not only modifying the cable stops but also altering the shifter bosses. With Dan’s step above, only the cable stops are modified. His technique is obviously less work and nothing is permanently altered on the frame. But, I do not see my frame alteration as anything too alarming. The 5mm tapping is simply adding convenience. Plus, if you don’t have a drill press then the choice to alter the cable stops and tap the holes out to 5mm is simply is not much of a question.
Obviously there is more than one way to get around the frustrating B-Stop Blues and I am certain there are still more. If you have a different technique that worked for you, feel free to contact me as I would be happy to update this page with your technique(s) to help future owners of B-Stop shifter bosses who would like different options other than using the one-dimensional Shimano Deore downtube shifter levers.
© Josh Capps and The Simplicity of Vintage Cycles. Unauthorized use and/or duplication of this material without express and written permission from this site’s author and/or owner is strictly prohibited. Excerpts and links may be used, provided that full and clear credit is given to Josh Capps and The Simplicity of Vintage Cycles with appropriate and specific direction to the original content.


Hi there, I had the same problem on a Univega frame of the same vintage. I did all of what you did but because I have a drill press, I placed the stops face down in a drill press vise and found that a 1/2″ drill works perfectly I drilled out a little at a time until the stop snugged right up to the frame. You have to file a little deeper but the fit is perfect and the original bolt works. thanks for the start.
Any good shop (professional or serious home hobbyist) has a drill press which is an absolutely perfect tool for boring out the cable stay so that it fits on the odd sized boss. Unfortunately, I only own a hand drill and I was not about to risk ruining the cable stays so I had to make do with other clever, yet somewhat crude, solutions. Mine worked but yours, I’m sure, worked better.
Thanks for the comment and for swinging by the site!
Josh, did you tap out the hole of the boss yourself? And to what size?
Funny you should ask about the hole/boss/bolt conundrum. Since I have been testing out the Kodiak as my daily commuter, apparently, one of the bolts that holds the cable stay to the boss has rattled out. This fits in with your question because I didn’t drill/tap the boss holes. I found that by using a bolt that was standard (roughly 11/64″) instead of metric seemed to do the trick. It wasn’t a perfect fit, hence the reason it probably rattled out, but it held. Luckily, the modifications I made to the cable stops wedged them tightly onto the bosses. This is why, even without the bolt, the stops are holding just fine. Although this is not a permanent solution by any means.
Over the past few months I have discovered other issues as well, which I plan on reporting on in the future. That post will likely come once I make my decision on if I go through with a tear down the frame and alterations, then a build up the way I envision or if I end up selling the Kodiak for another tourer. Only time will tell!
Thanks again for the question and for stopping by!
I have 2 1984 Schwinn’s (Voyageur/Tempo) that utilize these shifter bosses. A previous owner filed the actual boss to accept a Shimano 6-speed indexed spacer. Since it’s already been altered, I’m thinking of filing it to see if it’ll fit standard dt shifters.
Also, the bolt size is 4.5mm, ridiculously hard to find. I tapped fine out to 5mm. Not sure how they’ll work long term, but worth a try.
Hey David,
It’s nice that the previous owner already took the liberty of making the difficult and permanent choice for you regarding altering your frame. I also believe that your solution to tap the existing boss to accept 5mm bolts is a fine solution. I was somehow able to use a standard threaded bolt and make it work without tapping out the boss but one of the bolts worked its way out, out so I need to figure out a more permanent and effective solution. What I would like to do is have a local frame builder remove the bosses then attach standard bosses so this is no longer an issue. If I went that route, I would also have the frame builder add a couple other different alternations and from there, a custom paint job would be in order. It is a possibility for the future but not until I finish up with grad school!
Thanks for sharing your comments, David.
Josh,
As mentioned previously, I’m the original owner of both 21″ and 25″ Raleigh kodiak touring bikes, bought in 1984 for my wife and me. I recently reconditioned these bikes, and wanted to change to bar ends on mine. Following the advice above, I have finally installed a workable solution.
Using Shimano cable stops, and drilling the inside of the stops using a drill press and a 1/2″ drill, the stops fit will snugly against the down tube. (Hint: I screwed the stops, inside facing up, onto a scrap 2×4 with a screw that fit in the mounting hole. I then mounted the 2×4 into my press vise, and held the stops from turning using a pair of vise grips. I drilled very slowly, making sure not to go too far.) Yes, I also had to manually file one edge of each stop to fit over the tab of the boss.
The original 4.5 mm screws that held the original shifters on the down tube bosses have 2 full turns of grip on the new cable stops, enough to be snug.
I bought a set of Shimano BS64 shifters, complete with cables, etc. Everything new works fine with the original Shimano Deore components-of course, friction only.
Much nicer than reaching fo the down-tube shifters on a descent.
Best wishes, good riding.
Dan
Hi Dan,
Excellent upgrades to my previous attempt! Having a drill press makes a huge difference. I would have killed for that tool when I was modifying. I also felt I could have done a cleaner job if I had a Dremel and I almost bought one just for that reason alone. I still feel like that is a tool one who tinkers on bicycles should have. Regardless, I believe your solutions sound fantastic and would love to see the results you achieved (so I can also post them for other, future home mechanics to see) if you have a chance to snap some shots.
Thanks for the update!
Sweet ride! I have a similar Raleigh touring bicycle which I have just dropped of to be painted. Do you still have this Kodiak? Did you ever get it painted?
I do still have the Kodiak. In fact, it has been my go-to commuter now for well over a year. After some time to think about this bicycle, I have come to the solid conclusion that I will not paint it, however, I am planning on updating some of its components in the near future. With the update, I hope to touch up the paint and possibly even remove/replace some of the decals to spruce it up a bit. Depending on the results, I may (or may not) report on it, however, since I dub this a “saga” above, I feel as though I should continue reporting on any updates regardless on their level of success.
Thanks for the comments/questions and please do keep watch as the chances of seeing this bicycle again on the site is very high.
Pingback: 1985 Raleigh Portage rejuvenation (Part II) | The Simplicity of Vintage Cycles
Pingback: Cycling in Print :: Raleigh Lightweight Touring Catalog, 1984 | The Simplicity of Vintage Cycles
Josh,
Interesting update on the Kodiak’s shifter bosses! Retapping the hole to accept a longer, more standard 5 mm screw certainly makes the cable stop attachment more secure.
However, I must admit I’m confused how just retapping the hole allowed you to “move” the stop closer to the frame to eliminate the gap between the stop and the frame that is visible in your original installation. On my Kodiak, I had to remove metal from the inside of the stop to allow it to fit over the boss further, in addition to manually filed grooves to fit over the “ears” of the bosses.. Perhaps we used different cable stops?
Also,
I don’t think I used the word “unsightly.” I wasn’t trying to criticize your install.
Regardless, thanks for the update. Good riding!
Dan
It’s great to get your thoughts on the post, Dan!
I should start off by saying that I didn’t mean for it sound like you were criticizing my installation. I was pointing out that my first attempt really did have an unsightly gap and that I wanted that rectified so my build would look right and tight. Not having something done correctly isn’t my style, reflects poorly on the bike and demerits my credibility.
By retapping the hole, I was able to properly accommodate 5mm bolts that seated appropriately compared to the bolts I previously used, which worked but didn’t quite grip enough. Looking back, I’m not exactly sure they were the correct size but they allowed me to limp by. Either way, with retapping, I was ensuring the bolts gripped tight and the cable stops followed, reducing the gap making for a much cleaner result. One I am much more content with than what I rode with for over a year.
Thanks again for swinging by! It’s always great to hear from you.
Hi there, great write up! Do you know the original thread pitch of the 4.5 mm bolt? Like is it M3, M4 or M5? I am going to do my best to find bolts that fit before trying these methods, though I know it’s probably going to be fruitless. Never hurts to try!
Ooops after doing more research obviously I didn’t know what I was talking about with the M4 or M5 comment. Obviously it’s M4.5! But what is the pitch? Are all M4.5 bolts 0.75 pitch? That’s the only thing I can find. Anyway I cannot find an M4.5 bolt anywhere so far.
As you have determined Peter, those bolts are M4.5 and thread pitch is something I am not aware of. Loose Screws used to sell M4.5 fixing bolts but do not any longer (you could email to double check?). Personally, I suggest tapping them to M5 x 0.8 and calling it good.
Well it seems I’m committed to the 4.5 solution now! They actually do have a few in stock at Loose Screws. Shipping to Canada cost me twice as much as the stupid bolts but at least I’ll have them. I guess I’ll learn from my mistakes if this turns out not to be the greatest fix – I understand they are quite short for the purpose and I may have to do a bit more whittling of the cable stops to get the bolts to hold firmly. We’ll see!
Nice work on the M4.5 find. Keep me/us informed on how the progress goes. This is becoming a post where many of the comments are more valuable than the content above! 😉
FWIW I found my 1986 Raleigh Kodiak does have conventional square bosses and the cable stops slid right on.
Very interesting, Jim. I suspect you have a later model Kodiak where Raleigh started making changes, as I’m certain people didn’t enjoy having proprietary shift bosses that could only accept one model of shifter. Or Raleigh ran out of the B-shifters and had to use the conventional bosses. Which in that case I’d say your frame was lucky it was spared!
You’re telling me! I was about to drill out the stops when I realized I hadn’t even pulled the old shifters off yet to measure how far to go. Only then did I see the square bosses.
What. A. Score.
There seems to have been one other change made to the frame for ’86 – the chainstay length. I measured mine at 18.5″, the same as a Trek 720 🙂