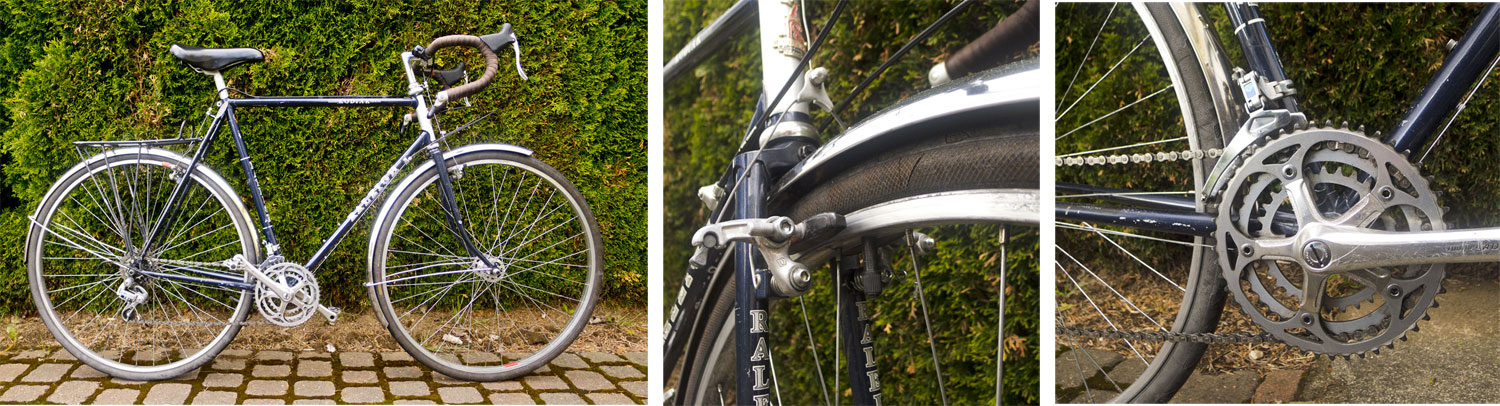
1985 Raleigh Kodiak: Spring Cleaning
Purchased as a playground for new and vintage part experimentation, my main commuter, a 1985 Raleigh Kodiak, begged for a freshening up.
More than two years has gone by since I purchased the Kodiak. Soon after it was acquired, I quickly tore it down to the frame and built it back up, on the cheap, with its original parts. Many parts were understood as only being used until they either broke beyond repair or until “someday” came for me to overhaul the bike properly with my own personal touches. Over time and hours in the saddle throughout varied weather and pavement conditions, I had come to realize what needed to change in order to keep it in more efficient working order as a near-daily commuter and give it the shine I knew was under all that grime.
Shots taken before the revitalization
Before the cleaning, the functionality of the Raleigh was adequate but I also knew it could be better.
Once I had come to the inevitable conclusion that a modifications were necessary, parts were slowly acquired and a plan was made. I knew spring was the time for the transformation.

1985 Raleigh Kodiak. Refreshed and ready to ride.
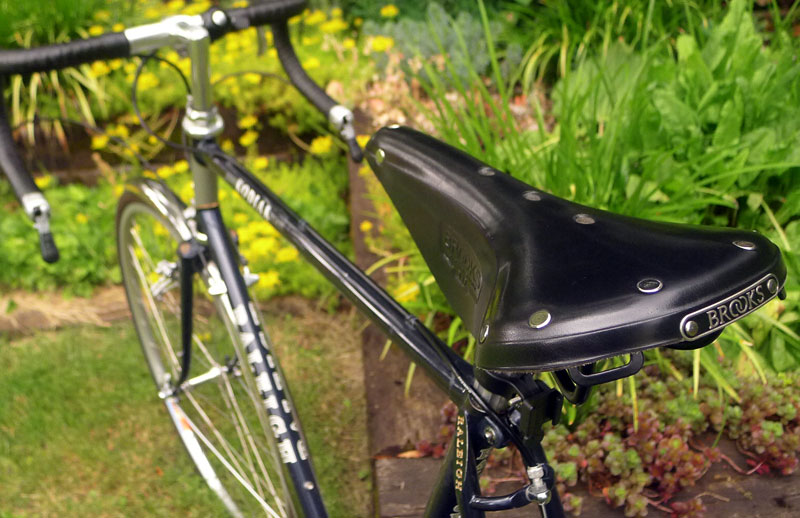
Bar tape update
Since this is my own personal build, experimentation still reigns supreme. I decided it would be entertaining to take a simple solution to an extreme level. Below is what it looks like when Newbaums black cloth bar tape, finished with twine, is encased in seven coats of shellac. Yes, seven.
I read at one point that seven was the magic number to give bar tape the full shine and superior protection so my bar wrap was put to the test. After each coat was applied then dried, it became more and more entombed in a rock hard casing. Even though it is thick and solid now, over time, I expect the shellac will start flaking off. I plan to keep the coating on an annual schedule adding a light top coat where my hands start to wear through. But with the current status, I do not look for noticeable wear to begin anytime soon.
When these photographs were taken, the shine was incredible but over time, it has cured into a less noticeable, yet still polished patina. In the end, I am pleased with the results but next time I may tone it back to five coats, maximum.

Cloth, twine and shellac
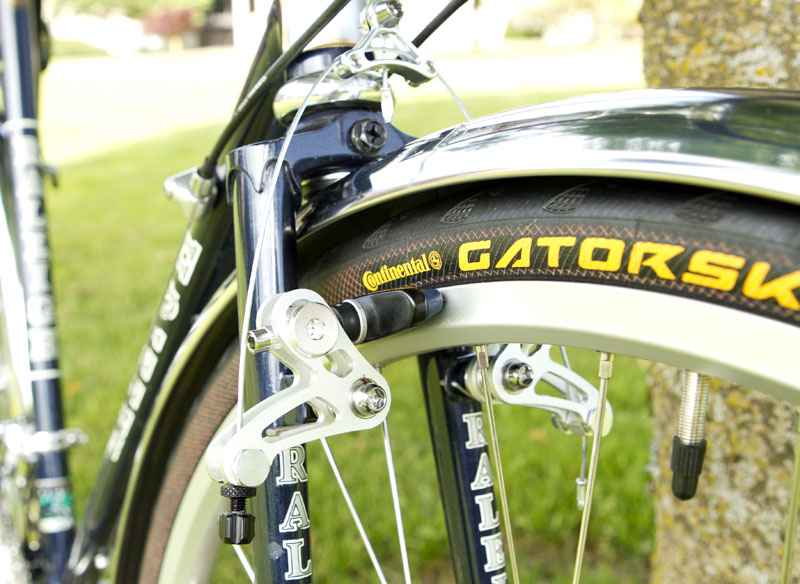
Modernized braking
Piggybacking onto the ’86 Nishiki Cresta build, I also decided to try out the Planet X Frogs Bollox cantilever brakes. The stock Dia-Compe brakes I had previously used for years had certain shortcomings, mainly ease of adjustments. The Frogs have obliterated that issue giving multiple methods for caliper and pad adjustment. Another element I was pleased with was the discreteness of the overall look. I am always on the hunt for new parts that upgrade function but still keep a muted, vintage atheistic. The Frogs seem to fit the requirement and showcase a unique blend of vintage and a bit of an industrial look, somewhat similar to the Paul brand. Of course, along with a new brakeset came new stainless steel cables and housing. A job like this would not even be considered without it.


Crankset range versatility
The Takagi Tourney AID (48/40/30) crankset that was stock on the Kodiak seemed to feel that it was lacking a more broad gear range. When I found an extremely lightly used Sugino AT (52/46/28), I knew it would be a winner. The gearing now feels quite a bit more dynamic and I’m finally able to really get going on the straightaways. I used the 28 tooth chainring only once and that was on an extreme incline. I was only loaded down with a single pannier full of office clothing but the result was a beautiful blend of ease and power straight up. To cap off the crankset installation a new SRAM PC830 chain replaced the aging and stretched KMC.
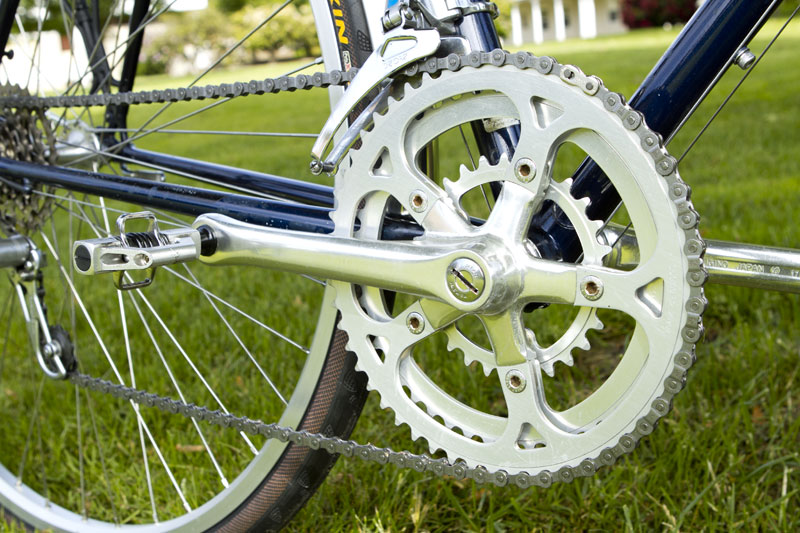
The 52 tooth chainring gives speed while the 28 tooth pulls hard
New and old wheelset
On hand I have been coveting a set of Suntour 36 hole touring hubs that have been bagged and tucked away in darkness for years. The original Raleigh hubs were satisfactory but they needed more love than I cared to give them due to their years of abuse before I acquired the bike. Plus, the mismatched wheels they were laced to (Araya and Weinmann) had seen better days.
The Suntour hubs were a clear winner for the build. They were polished to a high shine then carefully married to a new set of Velocity Synergy 27″ wheels with Wheelsmith doubled butted spokes along with tried and true Continental Gatorskin tires. These tires have been a staple for many of my builds with a reputation as nearly bulletproof in terms of flat protection and wear longevity.
So far, the results have been outstanding. The main concern I had was with the rims braking surface but the wheels feel even more solid than I expected, even with the non-machined, brushed sidewall finish.

Other additions and updates
Once the momentum begins when rebuilding an old classic, other elements creep in that weren’t expected. But without those added details, the build would not feel complete. So, other modifications were incorporated that aren’t necessarily highlighted as standouts, like above. Edits such as the installation of a new black, Brooks B17 narrow saddle. The saddle wasn’t a planned addition and installed as a bit of an afterthought. The B17 is quite different than the Vetta Centurion Anatomic I have rode since purchasing the Kodiak. The look is certainly enhanced for the better but I have yet to fully break in the leather on the slender saddle. As time goes on, I know it will mold to my sit bones but until then, the ride is still quite stiff.
Also checked off the long-time alteration wish list was a touch-up paint job that made an incredible difference I did not expect. No color was found that passed the “ten foot test” on the frame so I mixed my own custom color. The results aren’t fully apparent from theses images but in person, the addition makes more of a difference than I ever thought possible. Along with the frame, the Blackburn aluminum rack also received a touch up. A fresh coat of matte black paint was sprayed and instantly color cohesion emerged. All of the cleaning, replacing and tightening up merged together into a tidied up and complete full spring cleaning for a fine machine now ready for another few years of commuting.
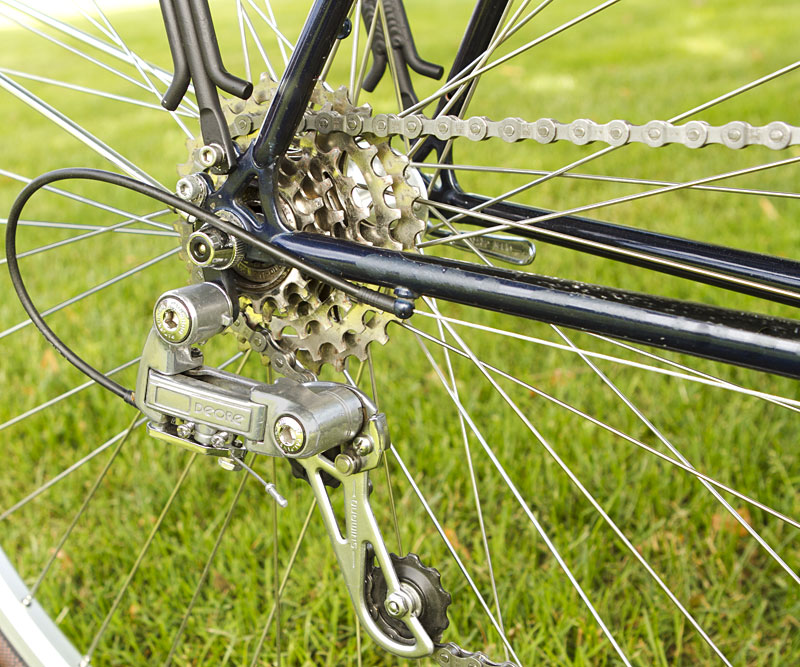
Debadged Shimano Deore rear derailleur
© Josh Capps and The Simplicity of Vintage Cycles. Unauthorized use and/or duplication of this material without express and written permission from this site’s author and/or owner is strictly prohibited. Excerpts and links may be used, provided that full and clear credit is given to Josh Capps and The Simplicity of Vintage Cycles with appropriate and specific direction to the original content.


Very sharp looking!
I’ll tell you that I’ve found seven coats to be the magic number of shellac layers, quite frankly. After the first two drenching coats, which tend to get sucked right into the cotton wrap, every other layer is quite light. I like the sheen and waterproof-ness of cotton tape sealed by shellac. And just a side note: The shellac will not flake off. Rather, it will wear down instead; over time, and with additional touchup coats every nine to twelve months or so, the grip will slightly “smooth” out a bit. But I find that nice tooth and grip remain for a very long time. If you touch it up on an annual basis, there’s no real reason you can’t make that wrap last for years and years, and continue to look almost brand new the entire time. A further note: Although I’m sure it’s been done a lot, I’ve never seen black in shellac before. Most folks seem to want to replicate that “French” look of quasi-leather, I suppose. But your black bars really remind me of an NOS pair of wrapped bars I stumbled across and used on a vintage Follis. They had a faux black leather wrap that seemed almost luxurious to behold, and they had a gorgeous sheen to them. Yours remind me of that.
I like your choice of the AT triple, by the way. I have an AT triple that was new in the box, and which found its way onto my Katakura Silk. It’s an excellent crankset that I find very pleasing indeed.
If you grow weary of those bulletproof Gatorskins, consider the Compass line of tires. I added a pair to my Boulder Brevet this spring and I’m very happy with the ride quality. My Gatorskins migrated over to the Raleigh International, where they continue to deflect bullets and glass shards and stray pieces of tire wire.
I completely agree about the process of applying the shellac. The first two coats left me unsure the product was even taking hold but then, as you perfectly describe, it begins showing a light glow that grows with each coat. Since you obviously have experience with the process and upkeep, I am pleased to hear how it will wear and what steps will need to be taken to keep it maintained. Thanks for that!
The range of chainrings the AT provides is absolutely perfect for the riding I do. Before replacing the crankset I contemplated if a 52 tooth chainring was too large for a Portland commuter rig, usually weighed down with two full panniers. But in the end, I realized it was just right. The ride has quite a bit more giddyup now on the flats and downhills. Exactly what I was hoping for.
I will consider the Compass line as I have read nothing but positive reviews on 27”, 700c and 650b tires. I get a screaming deal on Gatorskins at my local bicycle shop but Compass is sure tough to beat since they provide a tire that fits a vintage aesthetic more completely than Continental. So, perhaps next spring a new set will find their way onto my old friend.
Thanks for the thoughts, Mark.
Oh, I know someone would mention Compass Tires! 😉 I checked and they don’t stock 27″ tires, which I would assume that the Kodiak has 27″ wheels, as it was pretty much standard for mid-80’s touring rigs. (There of course is the 650B Raleigh Portage, though.)
And nice job on the bike. I like the cloth tape/shellac look. I tried it once on my XO-3 but I prefer shellac and cork wrap, as it’s more comfortable for my hands.
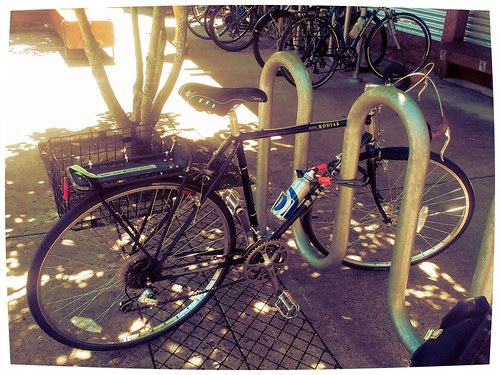
In fact, I just spotted another Kodiak today:
I have always enjoyed the feel of cork grips and when encased in shellac, they take on that wonderful French look Mark speaks of in his comment above. Over the years, however, I have started leaning towards the clean look of cloth. The most common comment I hear is how uncomfortable it must be but typically, I ride with higher end riding gloves with above average padding which seems to help mitigate any discomfort. Sometimes though, for short trips, I will ride gloveless and even then the coarseness of the fabric (and now shellac) and lack of padding doesn’t seem to bother me. Personal preference is a funny thing, isn’t it?
Josh,
What a great job you have done on that bike. A fellow at our local bike co-op told me of a Kodiak for sale,found on CL asking $400.00 but it was near Daytona Beach, all the way across the state from my place in St. Petersburg. I went on CL and, sure enough, found it. I called instead of emailing him, asked a few questions, told him to hold the bike and drove over the next day. My roundtrip cost under $40 and 5.5 hours of drive time. I will use your bike as inspiration for my rebuild. Yeah, you did one heck of bang up job on that beauty. I soaked my with WD-40 for a few hours and then used 4 0000 steel wool to slowly remove the years of grime. Tomorrow, the Mothers Wax goes on. Yep, this baby is going to be looking good. I did have one question for you. Did you ever think about using 700 wheels and if not, why not?
I sincerely appreciate the kind words about my Kodiak, Rob. Thank you.
$400 isn’t a bad price and as long as it has been well taken care of throughout its life. If so, you should be in for a treat. Even today, my Kodiak is still my go-to, all-around commuter bike. It never fails me and still continues to be the guinea pig for any item or technique I want to test out. It’s changed a bit over time but I don’t do anything that can’t be reversed and try not to take away from the aesthetics I hold true to.
Regarding the wheels, I’ve stuck with 27″ wheels throughout my time with the Kodiak. Even my new wheels were built 27″. I am lucky that I can find 27″ x 1-1/4″ tires fairly easily here in Portland (and online) and I didn’t want to deal with any possible complications, such as overcoming the 4mm brake reach difference. Not saying it can’t be done, I just didn’t want to take the extra time to solve it if I didn’t need to.
You sound like you are well on your way to a fine machine with the cleaning techniques you outline. Please do feel free to send images. I would love to see your progress!
I love seeing vintage steel lovingly restored but I love it even more when that restored bike is getting used and being useful. The Kodiak is looking great. I will add I like using 27″ wheels too and the chatter on bike forums about how “you can’t find tires for them” bugged me so much I wrote a blog post debunking that myth 😉
Again, I am humbled by your kind words, Ryan. Thank you!
This bicycle has served me well for a number of years now. It mainly serves as a commuter but one that doesn’t see neglect and unkind treatment. Sometimes, however, it gets to stretch its legs for a multi-day tour and that’s where it truly shines. It is very stable and quite comfortable for miles and miles and miles.
As for your 27″ comment, I do appreciate your thoughts on that subject (https://ryansrebuilds.blogspot.com/2013/02/myth-busted-there-are-very-few-options.html). It’s nice to know the conversion equivalents for future tire purchases. Nice post!
Thanks for the plug Josh.
I bought one new in 1985. They ride awesome
Agreed, William.
I rode mine for years as my main commuter while in Portland. It was light and nimble yet felt balanced and capable when I weighed it down with full panniers. Someone once told me, “you could haul a house on that thing if you could find a way to balance it.” I’m not sure that statement is entirely true but I absolutely understood the point they were trying to make!