1960 Urago (Part I)
Obscure bicycles can get lost in history. Time clicks by and details disappear into black holes. But using modern 3D printing, a replica enlivens this rare frame.
Purchased from the original owner, a handbuilt, 1960 Urago made its way to my workstand. The bike has a well-documented history, including a fresh coat of paint somewhere in the 80s. This is where the historical patina of the finish, including the headbadge, was lost. But, this post isn’t about the bike. Not yet at least. I’ll save that for the next update. For now, I need a solution.
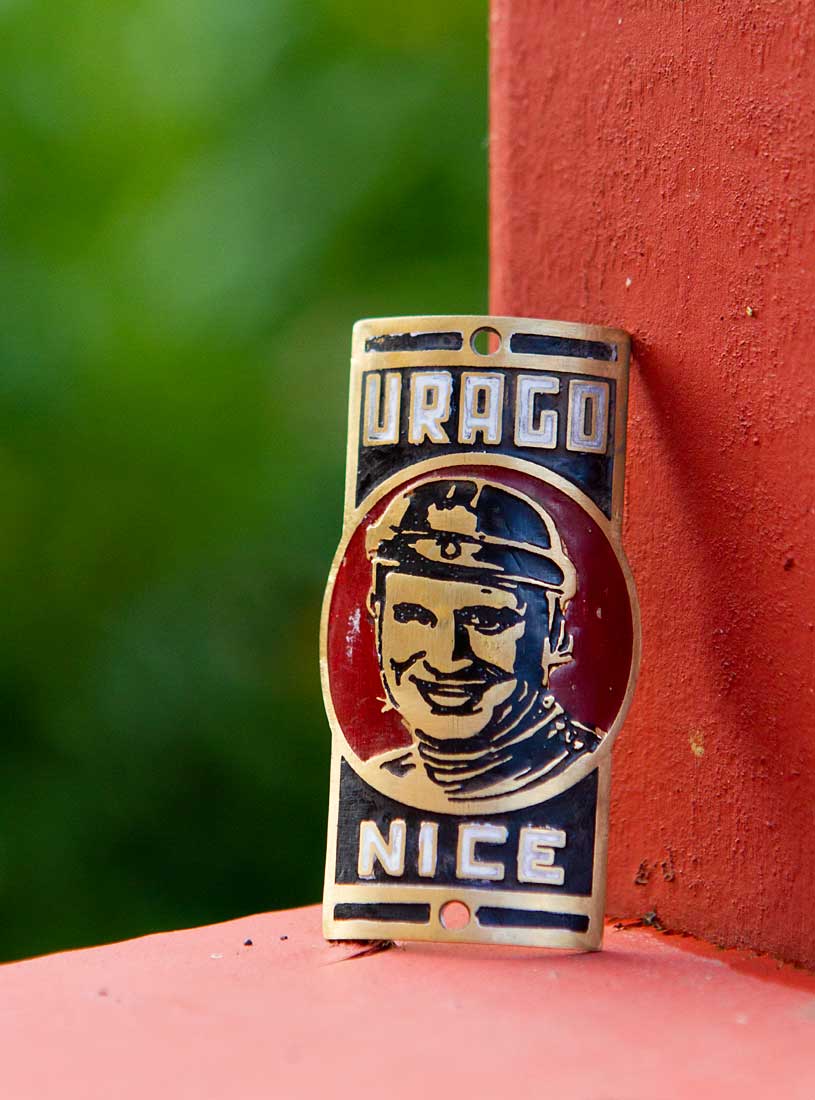
Urago 3D Printed Headbadge
What’s the problem? The Urago has waited four years for a refresh, hanging patiently in my shop with only two, 2mm holes stopping me from moving forward. These tiny holes are where the headbadge should go and I can’t call a job complete without that patch of real estate filled. Fast forward to today. Two years has gone by filled with internet searches, eBay alert false alarms and solicitations to headbadge collectors across the world all returning bleak. With not even a sliver of a lead for finding a replacement Urago headbadge in site, I engaged a crew I know well—the Classic & Vintage forum. I hit pay dirt on my solicitation. Rudi, an artist in metal and leather who is active on the forum, happily enlisted to recreate the headbadge for me.
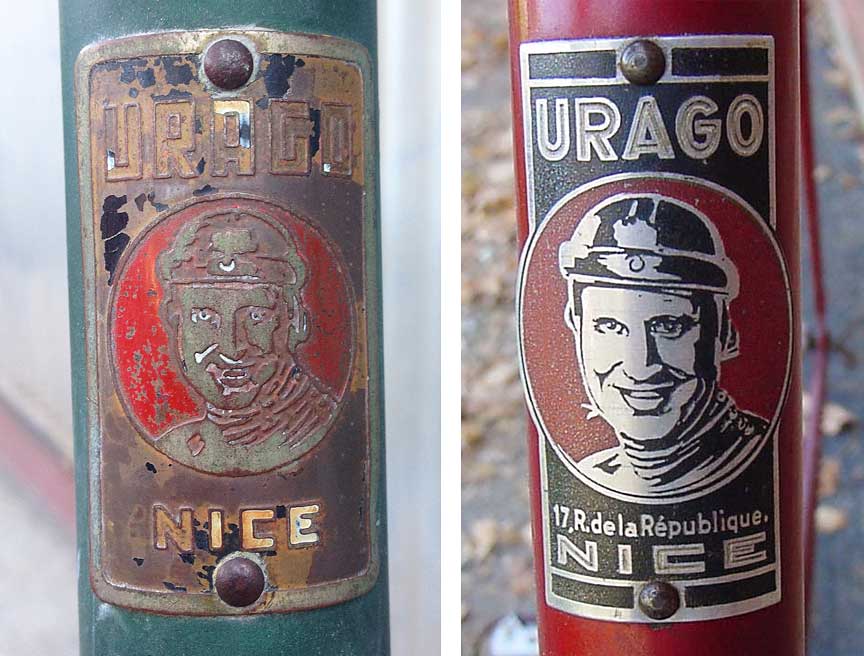
Original Urago Headbadges; Circa 1960-1970s
Why shouldn’t I recreate the headbadge? The alterative is letting the project stagnate, as it has for four years. So, I heard him out. Rudi suggested 3D printing the headbadge. We can tweak every element including how much relief is cut, badge thickness, what substrate I want it produced on and the colors to fill it with. I’m intrigued. So we began the creation process.


Using images off the internet, the image for the die is created. Two original Urago headbadges are used as our guides. The goal is using both to create a sort of, original hybrid. The differences include increasing the size of the word, “Nice” to stand more prominently. This is where the bicycle was crafted and it should rise up as a source of pride. I also liked the color bars above and below which frame the badge in. So, those were added. I also wanted the oval picture window extended past the rectangular area, similar to what is shown in the headbadge on the right. More small adjustments were made and as the image took shape, I felt my goal of marriage between the two headbadges was achieved. This helped to preserve the history but tweak what I liked about both badges, further justifying creating a badge rather than continue the fruitless hunt I had been on for years.


Rudi used Shapeways to turn the 2D grayscale graphic into a 3D model. He dug in reliefs, provided proofs and when it was right, we decided that creating the headbadge on brass was the only material that made sense.
Headbadge created, die tabs cut off and colors selected, Rudi applied paint. A high-gloss headbadge, oozing perfection, didn’t quite fit with the nearly 60-year old build so areas were purposefully distressed to give it a slightly worn and imperfect look. Even with a repaint in the 80s, this bike is a rider. It has battle scars. These are something I couldn’t imagine erasing. The badge had to have some of those same elements.
The last step was bending the badge to fit the head tube. Some gentle compression was all the thin badge needed to fit the headtube.


Overall, I am incredibly pleased with Rudi’s work. In past forum posts, I’ve seen him recreate saddles from loose hides of leather and ancient saddle frames so I knew I was in the presence of true craftsman royalty when he offered to provide assistance.
What also pleases me is to see how technology can sometimes serve for a greater good even when one is trying to go back in time. Is the headbadge original? No. In fact, no on a few levels. But time continued ticking by and this bicycle deserves to be back on the road, not hung up in a battle of searching for a needle in a haystack. Without Rudi and the ability to 3D print, I would certainly still be searching for the elusive “smiling man” headbage and as it has been said, the show must go on!
© Josh Capps and The Simplicity of Vintage Cycles. Unauthorized use and/or duplication of this material without express and written permission from this site’s author and/or owner is strictly prohibited. Excerpts and links may be used, provided that full and clear credit is given to Josh Capps and The Simplicity of Vintage Cycles with appropriate and specific direction to the original content


Nice that you could find a solution. Looking forward to reading about the build next!
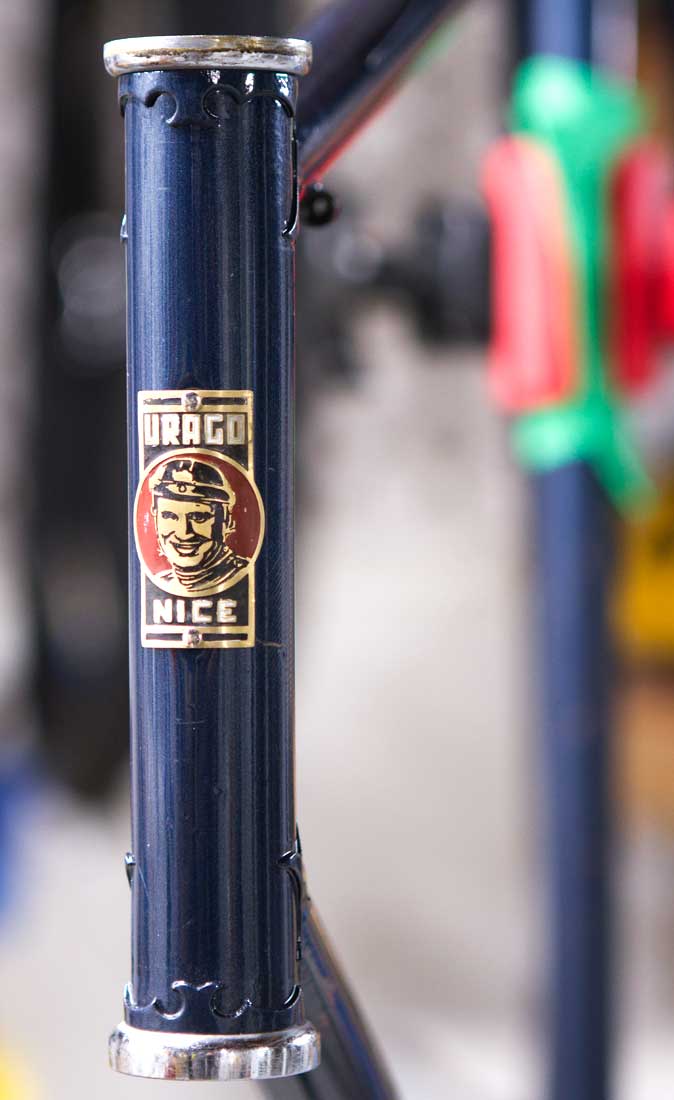
With the headbadge out of the way, the rest of the build really should zing by since I’ve been working on the back-end of the project (ie: components, wheels, etc.) for months. Although, I am hoping someone will notice those Nervex lugs on the image of the headbadge attached to the head tube as a preview of what’s to come!
! Totally agree merging modern technology to enable a better ride but creating a headbadge, who would of thought about a 3D printer? I enjoy the collaboration when working with a craftsman, picking their brains, etc.
Great story and a great job. Thanks for sharing? What other projects are in the works?
3D printing was absolutely not in my bag of tricks until the project, Rob. And without contact from Rudi, I would not have gone down this path. But, it was a clever approach to a problem that wasn’t getting any traction. To me, the story is fairly incredible but the true star of this post is Rudi.
As for projects, I have plenty in the works and on deck. It’s time that I lack!
Chapeau! the headbadge looks great, get that bike back on the road!
My first chapeau! What an honor. Thank you!
Very nicely done!
Much obliged!
An interesting solution and one that I may employ for the missing Mercier Meca Dural head badge I have been searching for. Thanks for sharing this.
Have I got the fella for you!
If you’d like his email, contact me offline and I’ll pass it your way. That goes for anyone else as well. It’s not appropriate to post on the blog, however.
I just saw a Urago triple on this FB group. It has a sticker head badge.
https://www.facebook.com/groups/42851702426/?fref=nf
Pingback: 1963 Urago (Part II) | The Simplicity of Vintage Cycles