Project: DIY Bicycle Fork Painting
Restoring bicycles. Not always simple but experience teaches. Painting bicycles? This is the line at which many restorations cease.
The challenge of painting bicycles can be multifaceted.
- There’s the high cost of top notch equipment, primer, paint and clear coat.
- There’s the experience one needs to hone the craft to mastery. That means either learned through apprenticeship, relentless YouTube videos or the ‘ole school of hard knocks.
- There’s the trickiness of where to paint and cure the product. Both indoors and outdoors has their own challenges and considerations.
- And maybe most importantly, there’s the environmental impact and solvent exposures one will inevitable receive, no matter how good the equipment, to health hazardous volatile organic compounds (VOCs).
There certainly are more reasons but the point being is that with all these roadblocks, why even venture into this world? Because you, like me, enjoy the struggle. You live for the challenge and you understand that patience to any good project is a virtue. But, there’s also another reason. Because sometimes, a project doesn’t have to be show-room quality so there’s no reason to break the budget to create a show room finish. This last reason topped all other listed justifications and became my call to action into the world of bicycle painting.
But first, let me set the stage. Luckily, I didn’t need to paint the entire bicycle frame.
I only needed to paint the fork.


Clearly an issue, the Paul Touring Cantilevers (above) are close but no matter how many adjustments, they simply will not effectively grab the rim.
Mid-80s touring bikes were a special breed. They were built on a blend of solid brazing techniques, usually crafted in Japan, strong yet lightweight steel and decades of touring design evolution baked in. They had it a lot going for them. Yet, unbeknownst to the builders, many of these frames were doomed for future brake option failures as cycling progressed.
At this point, cantilever brakes were the de facto standard for touring bikes. The problem was the distance between the front fork cantilever studs. These figures landed around 75-80mm, which is much too narrow for modern cantilever, or other styles, of brakes to handle. Modern cantilever brakes won’t close on the rim and seat properly, as pictured above. The solutions to this are to either stick with the original brakes, find a set of modern brakes that fits (which can be incredibly difficult) or alter the fork.


I plan to keep this build so I used it as an opportunity to try my hand at painting the fork myself.
Through a local Portland frame builder, I was able to have the old cantilever studs removed and new studs brazed appropriately for a modern set of cantilever brakes.
As the fork was being altered, I dug into my local paint options. Portland is lucky enough to have a Sherwin-Williams branch specializing in automotive painting. The shop was small but the knowledge of the sales team had plenty of real-world experience depth along with product lines robust enough for any automotive, or bicycle, project.


I left with an aerosol can of self-etching primer, one aerosol can of paint that was made on-site from the metallic gray I was trying to match, one aerosol can of single stage gloss, a few pieces of high-end wet sandpaper in a menagerie of grits along with a head full of do’s and don’ts.
The process was simple… but tedious.
- Wet sand the fork carefully, working your way through the 200’s to 2000’s grit hierarchy.
- Carefully mask the area you don’t want painted.
- Blast with a couple light coats of primer. Let dry fully between each coat.
- Lightly wet sand using 2000 grit.
- Blast with a two to three light coats of paint. Let dry fully between each coat.
- Lightly wet sand using 2000 grit.
- Blast with a couple light coats of clear coat. Let dry fully between each coat.
- Give the product an extra long time to cure, such as a week, then wet sand again, very lightly, using 2000 grit.
- Once dry, apply your favorite automotive wax and buff off. Do this as many times as you feel necessary. I used two coats.
So I’m told, what separates good jobs from bad, much like any good project, is all in the prep work. This was harped on over and over by the Sherwin-Williams specialists. Some of the pull quotes burned into my mind were things like, “take your time”, “be thorough”, “let it fully dry”, “be patient otherwise it will show in your final product”.


The long spans of smooth fork blade were simple to sand but the nooks around the crown and eyelets constantly caused challenges. I wasn’t going for show quality, nor could I achieve that with an aerosol can, but not giving these areas the attention they deserve would certainly show in my final product. So, dutifully, I sanded on.
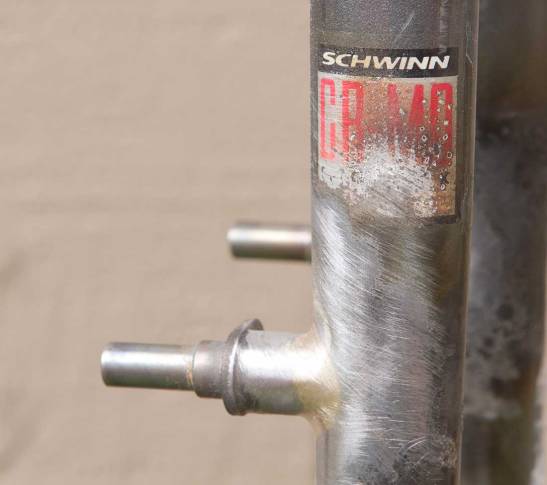
Throughout the stages, I noticed how imperfections and areas not prepped well were highlighted. Deeper blemishes in the steel shone like a waving red flag when wet. Dried back, the defects weren’t quite so bad but were still noticeable. My best examples are shown in the images of the cantilever posts above. The right cantilever post has a small pinhole dimple visible in the priming shot and also in the shot showing after paint is applied. Both images clearly show the dimple and the error is unmistakable in the final product. Although, as full disclosure, this deficiency was due to a less than stellar brazing and filing job. It’s also why I don’t mention the name of the frame builder who performed the work. Funny how it so many projects come back to thoroughness of prep and patience.
Easily, the most satisfying portion was using the aerosol products to create instant results. Of course, this only takes mere seconds while you could spend massive swaths of time wet sanding. Even while sanding, I found myself yearning for that next coat.

So how does it look? Overall, not too bad. Does it pass the 10 foot test? Absolutely.
There’s some very slight orange peel texture in small areas but overall, for a first attempt, I’m satisfied with the results. I anticipated the amount of gloss I applied was enough to bring it up to the same standards as the original paint job but I can see now either I didn’t apply enough layers or my gloss isn’t glossy enough.
Looking back, the process was straightforward. The down side, it’s also fairly monotonous. But, the steps are there. All you have to do is follow them. There was no expensive equipment to purchase, although the aerosol products aren’t what I would consider cheap by any means. But, unused portions of primer and clear coat could easily make their way into other bicycle paint projects, cutting down future costs.
I didn’t spray the fork indoors because I don’t have anywhere that could act as an impromptu paint booth. So I took advantage of mild, clear, windless spring Pacific Northwest days and performed the work in shadows rather than direct sunlight. It was nothing but a joy to be outdoors while painting but that type of glorious weather has a small window of time so other seasons would have the complexity of where to paint and allow for proper curing.
The end result was a painted fork that blends in with the rest of the build. So, mission accomplished. And although there were a number of small victories in this first attempt, what was most enjoyable to me was accepting a new challenge. It was learning how to tackle it the right way and expanding a new skill set. I don’t have plans to expand into this world nor try another home paint job but who’s to say it wouldn’t happen again. Because, hey, who doesn’t enjoy a little struggle sometimes?
© Josh Capps and The Simplicity of Vintage Cycles. Unauthorized use and/or duplication of this material without express and written permission from this site’s author and/or owner is strictly prohibited. Excerpts and links may be used, provided that full and clear credit is given to Josh Capps and The Simplicity of Vintage Cycles with appropriate and specific direction to the original content.


Speaking as someone who can’t match paint for beans when I try to touch things up your fork looks fantastic Josh!
Maybe we need to petition Velo Orange to make,or have made, modern featured canti’s that will work with those narrow 80s touring forks? If I ever have a large swath of frame to paint I will remember to look up Sherwin Williams for the paint match.
Its funny you mention prep, my father was, for a short time, an apprentice ship painter at the Naval Ship yards in Bremerton and what he passed along was that any paint project was 90% in the prep. It didn’t take long in the ship yards before he decided going back to school and getting his degree was a great idea. lol.
Much obliged on the kind remarks, Ryan!
I’ve gotten much better at my spot treating for touching up but it’s also come with quite a bit of not so good spot treating. In the past, I’ve kicked around the idea of investing in a dedicated indoor paint booth and working with a local painter to learn the ropes. But, it’s just such a separate and different (and EXPENSIVE) world that I feel like it would be difficult to master without pouring a few years of life into it. It is clearly an art and I don’t want to cheapen it by only putting in the bare minimum. So, like everyone else, I’ll use the craft sparingly and only when a frame really calls for a respray.
Funny that your father said the same thing about prep. It really does span through most physical projects, doesn’t it?
Hi Josh,
Great job…the fork looks good…as good or better as anything you saw coming of some of stuff coming out France on their less expensive 10 speeds in the 70’s and early 80’s! Some of those paint jobs were horrible!
Now you remember my 72 Motobecane Le Champion…well one of the things I was told about the paint on it when i was going over the details with the painter was that they wet sanded between every coat of clear after each dried thoroughly. it makes for a deeper glass like finish.
Also I have a few bike restorations on my schedule that will require repainting which I also plan to do myself. Since I too don’t have anywhere to paint indoors I’m thinking of making a temporarily painting booth using an enclosed ” EasyUp” that has the side curtains and an entry door. Of course I will be using a Organic Cartridge respirator, goggles, and disposable coveralls for protection.
Can’t wait to see your finished build!
Best Regards,
Kris Koller
.
Sorry for the errors in my grammar: I meant “you saw coming out of France” and “It makes for…….”
Thanks for chiming in, Kris! Your Le Champ is such a gorgeous teal blue. It’s nice to hear it was done right. I’m sure those extra efforts is another small part of why it looks so good 47 years later.
I came mighty close to creating my own spray booth but it is so easy to see how one could go down the rabbit hole. I guess I can only speak for myself but I’m not sure I’d know when to stop.
Good luck with your build and restorations. Feel free to follow up to this post and include some images too!
I had the same problem when I was restoring a 1985 Specialized Expedition frame. I have to say you spent a lot of money and time by having new bosses installed when you could have easily found brakes that fit if you’d only looked. The Tektro Calipers I bought would not fit but some older Shimano cantis that I found fit easily.
Dave Joshel, Davis CA
Hi David,
You know what they say about assuming! I didn’t pair up brakes for this build because I’ve already “been there, done that” a number of times on narrow-forked, mid-80s touring builds throughout my site (Look up 1986 Nishiki Cresta GT and 1985 Raleigh Kodiak, for quick examples and comparisons on ill-fitting Tektros). I went this route precisely because I haven’t gone this route before. Plus the new canti studs allow for a massively more versatile range of vintage and modern canti brakes rather than the 1 or possibly 2 different sets available leaving the posts as they are. And for the record, the Planet X Frogs Bollox cantilever brakes I’ve used a few times have vaporized a few years back which is yet another removed braking option for narrow forked cantis.
Was this method more work? Yes. More money? Yes. More time? Yes.
But I’m much happier knowing I’ve set myself up for success for years to come on my selection of calipers. I’ve also provided content for others going through the exact same conundrum. This helps so they can then judge for themselves which direction is best for their situation. Believe it not, some prefer to take a more difficult road in the beginning to allow for an easier journey overall.
Pingback: 1991 Schwinn Voyageur | The Simplicity of Vintage Cycles